ClassHive User Guide
🚨 ATTENTION ALL TEACHERS! 🚨 Introducing ClassHive, a desktop app for managing all your school contacts! ClassHive is a fast and easy to use app that helps you keep track of all the people you will need to contact, including colleagues, parents and students. In ClassHive, instead of having to click many buttons, you can simply type in commands to access any function! Let's now explore the different features that were built just for you! 🚀
🚀 Let's get you started!
Getting started with ClassHive is easy! Just follow these steps:
Check your Java Version
- To use ClassHive, you need Java
17or above installed in your Computer. - ❗Mac users: If you're unsure, follow this guide to set it up.
- To use ClassHive, you need Java
Download ClassHive
- Click here to download the latest version of ClassHive (
.jarfile).
- Click here to download the latest version of ClassHive (
Choose where to keep ClassHive
- Move the downloaded file to a folder where you'd like to store ClassHive (e.g., "Documents" or "Desktop").
- Move the downloaded file to a folder where you'd like to store ClassHive (e.g., "Documents" or "Desktop").
Open ClassHive
On Windows
- Open the folder where you saved the file.
- Hold Shift, right-click in the folder, and select "Open command window here" (or "Open PowerShell window here").
- Type the following command and press Enter:
java -jar ClassHive.jarOn Mac
- Open Terminal (you can find it using spotlight search,
Command (⌘) + Space). - Type
cd(followed by a space), then drag and drop the folder where you saved ClassHive into the Terminal window. - Press Enter, then type:
java -jar ClassHive.jar- Press Enter again.
- Open Terminal (you can find it using spotlight search,
Start using ClassHive!
- After a few seconds, the ClassHive window should appear, ready to help you manage your contacts easily.
- It should look like this! It will contain some sample data.

- Refer to the Features below for details of each command.
- 💡 If you're unfamiliar with using commands in a command-line interface (CLI), check out the CLI Tutorial to get comfortable before diving in!
CLI Tutorial
If you've never used a CLI before don’t worry! This short tutorial will walk you through the basics, and you’ll be managing your contacts like a pro in no time!
Getting Familiar with the Interface
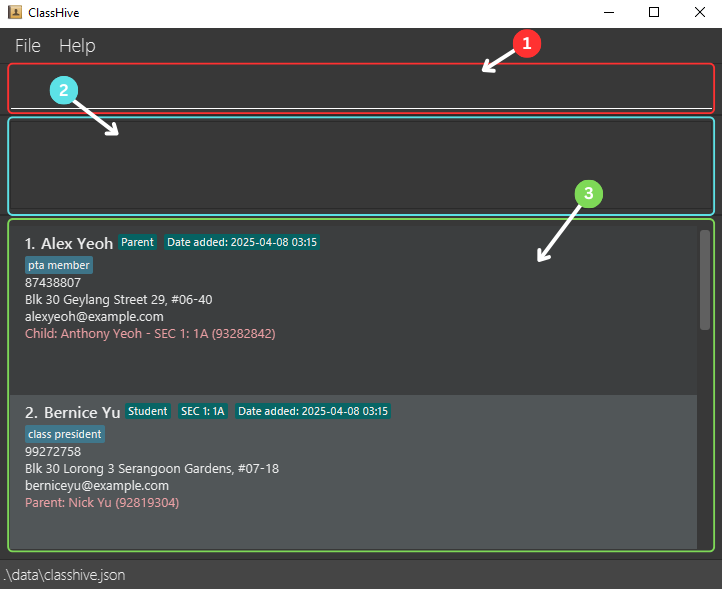
1️⃣ Command box
- This is where users type their commands to interact with ClassHive.
2️⃣ Result Display Box
- Displays messages about the executed command.
3️⃣ Contact List Panel
- Shows the list of contacts stored in ClassHive, including their details.
Try Your First Commands!
Now that you're familiar with the interface, let's try executing some commands!
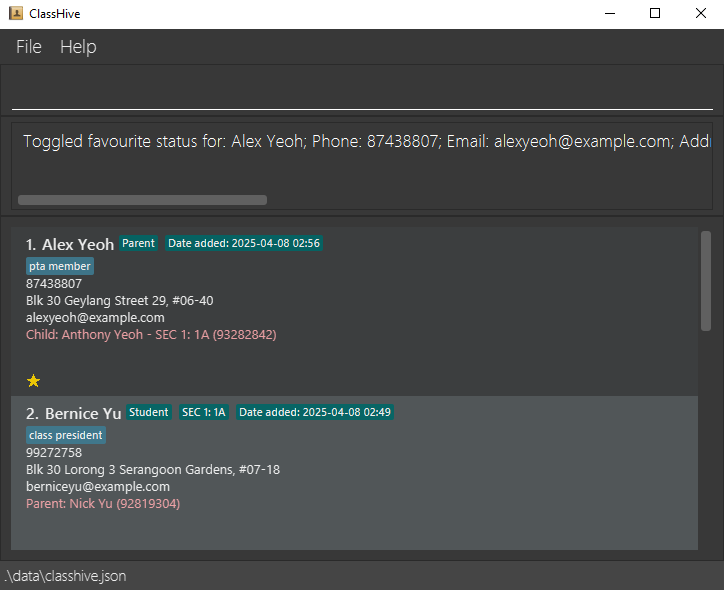
Command 1: ⭐ Favourite
1️⃣ Type the following command into the Command Box:
2️⃣ Press Enter.
3️⃣ You should see this.
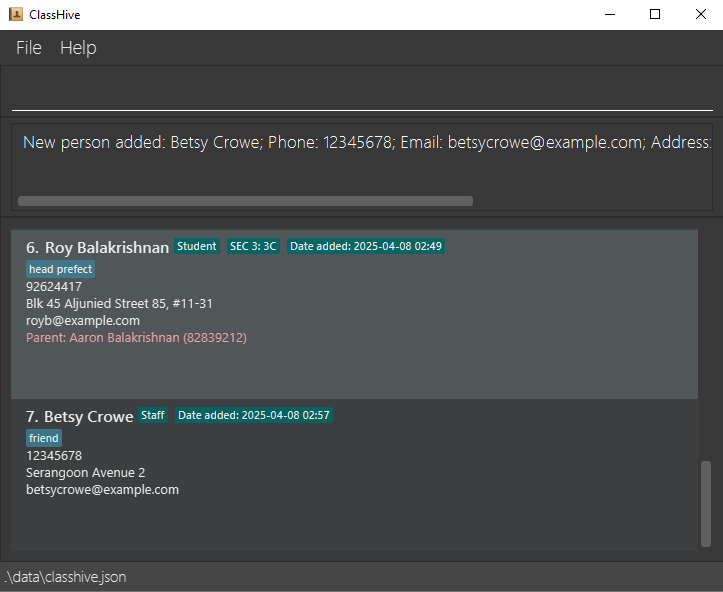
Command 2: ➕ Add
1️⃣ Type the following command into the Command Box:
2️⃣ Press Enter.
3️⃣ Scroll down the Contact List Panel.
4️⃣ You should see this.
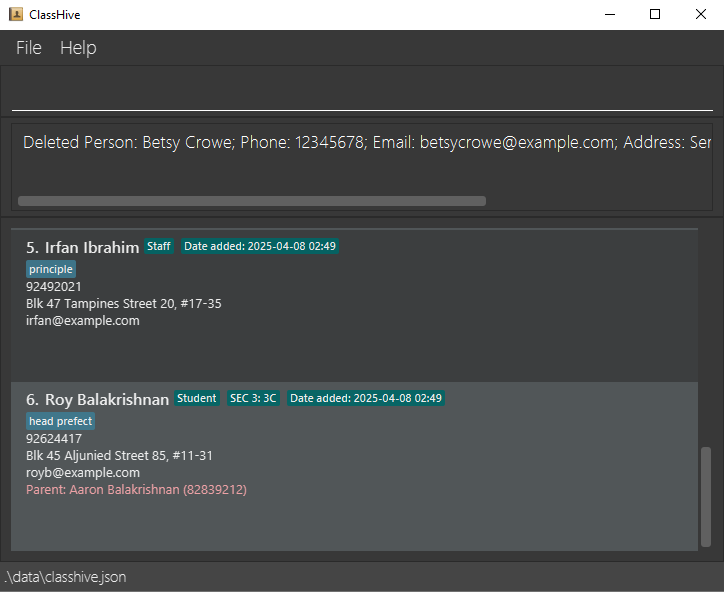
Command 3: 🗑️ Delete
1️⃣ Type the following command into the Command Box:
2️⃣ Press Enter.
3️⃣ Scroll down the Contact List Panel.
4️⃣ You should see this.
🎊 Congratulations!
You have completed your first few commands in ClassHive!🥳
You're now officially a ClassHive Pro. Head over to the Features section to explore more commands ClassHive has to offer.
Features
It will be useful to know some information about the command format before getting started on the features!
Here are some notes about the command format:
Words in
UPPER_CASEare the inputs for you to key in.
e.g. inadd n/NAME,NAMEis to be filled in by you. IfNAMEisJohn Doe, then type into the command boxadd n/John Doe.Items in square brackets are optional to specify.
e.gn/NAME [t/TAG]can be used asn/John Doe t/friendor asn/John Doe.Items with
… after them can be used zero, one or more times.
e.g.[t/TAG]…can be used as(i.e. 0 times),t/friend,t/friend t/familyetc.Parameters can be specified in any order.
e.g. if the command needs your input for a contact's name and phone number,n/NAME p/PHONE_NUMBER,p/PHONE_NUMBER n/NAMEis also acceptable.Commands that do not take in user inputs (such as
help,list,exitandclear) ignores the addition of any extra inputs.
e.g. if the command specifieshelp 123, it will be interpreted ashelp.All commands are case-sensitive, so make sure to type in the command in small letters.
e.g. useaddinstead ofADDorAdd
You can refer to the Command Summary and the Prefix Summary to see a summary of all commands and their related prefixes.
Caution: If you are using a PDF version of this document, be careful when copying and pasting commands that span multiple lines as space characters surrounding line-breaks may be omitted when copied over to the application.
Viewing help : help
Help is always near when using ClassHive! At any point in time, if you need instructions on how to use the app,
type help.

Format: help
Tip: You can also access help window by clicking on F1 or the help menu on the top left bar.
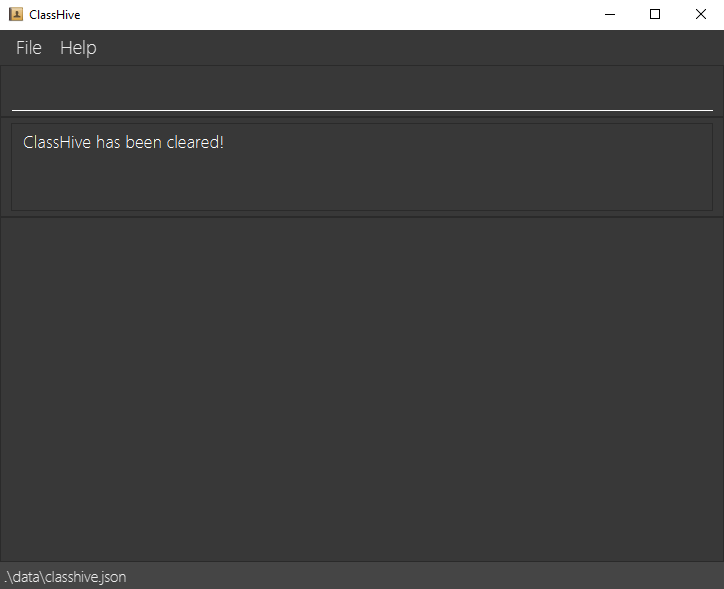
Clearing all entries : clear
When you first download ClassHive, you might want to use the clear command to ensure you're starting with a
fresh database. The clear command allows you to remove all contacts from ClassHive with a single command.
Format: clear
Caution: This is an irreversible action that will remove ALL your contacts from ClassHive. Consider backing up your data before clearing (see FAQ section on transferring data).
Before clearing the entries:
After clearing the entries:
Adding a contact: add
To make ClassHive ready for your personal use, add contacts into the app using the add command!
Format:
- For adding Students:
add n/NAME p/PHONE_NUMBER e/EMAIL a/ADDRESS [t/TAG]… r/Student g/GRADE c/CLASS rn/PARENT'S_NAME rp/PARENT'S_PHONE - For adding Parents:
add n/NAME p/PHONE_NUMBER e/EMAIL a/ADDRESS [t/TAG]… r/Parent g/CHILD'S_GRADE c/CHILD'S_CLASS rn/CHILD'S_NAME rp/CHILD'S_PHONE - For adding Staffs/Colleagues:
add n/NAME p/PHONE_NUMBER e/EMAIL a/ADDESS [t/TAG]… r/Staff
Note:
- A contact can have any number of tags (including 0).
- The role of each contact must be either a "Student", "Staff" or "Parent" (roles are not case-sensitive).
- Only grades from Primary 1 to 6 and Secondary 1 to 5 are currently supported.
- For Staff contacts, do not add the grade, class, family member's name and family member's phone number.
- Phone numbers must be an 8-digit Singapore number, without specification of the country code. Ensure that there are also no spaces in the middle of the phone number.
Tip: As the phone number field is compulsory, if a student does not have a contact number, you can add his or her parent's phone number instead!
Examples:
add n/John Doe p/98765432 e/johnd@example.com a/John street, block 123, #01-01 r/Student g/Sec 1 c/1A rn/Bob Doe rp/92932011adds the studentJohn Doeinto ClassHive.add n/Bob Doe p/92932011 e/bobd@example.com a/John street, block 123, #01-01 r/Parent rn/John Doe rp/98765432 g/Sec 1 c/1Aadds the parentBob Doeinto ClassHive.add n/Jamie Goh p/98128281 e/jamie@example.com a/Jamie street, block 123, #01-02 r/Student g/Pri 2 c/2C rn/Joseph Goh rp/98128272adds the studentJamie Gohinto ClassHive.add n/Betsy Crowe t/boss e/betsycrowe@example.com a/Serangoon Avenue 2 p/12345678 r/Staffadds the staff memberBetsy Croweinto ClassHive.
Expected output:
- Expected message displayed in the output box:
New person added: CONTACT, whereCONTACTreflects the details of the contact added. For example, upon running the command in the first example shown above, the expected output will beNew person added: John Doe; Phone: 98765432; Email: johnd@example.com; Address: John street, block 123, #01-01; Role: Student; Grade: SEC 1; Class: 1A; Parent's Name: Bob Doe; Parent's Phone: 92932011; Tags: - The new contact will be added to the bottom of the list of contacts. Scroll to the bottom to see it!
Editing a contact : edit
If a contact's information has changed, simply use the edit command to change the contact's details.
Format: edit INDEX [n/NAME] [p/PHONE] [e/EMAIL] [a/ADDRESS] [t/TAG]…
Note:
- Edits the contact at the specified
INDEX, which refers to the index number shown in the displayed contact list. The index must be a positive integer 1, 2, 3, … - At least one of the optional fields must be provided.
- If you are changing the role to
Staff, make sure that the fields[g/GRADE],[c/CLASS],[rn/RELATIVE'S_NAME]and[rp/RELATIVE'S_PHONE]are not included. - If you are changing the role to
StudentorParent, make sure that the fields[g/GRADE],[c/CLASS],[rn/RELATIVE'S_NAME]and[rp/RELATIVE'S_PHONE]are included.
Tip:
- You can remove all the contact’s tags by typing
t/without specifying any tags after it. - After running the edit command, the existing contact will reflect the new fields you have input.
Caution: When editing tags, all existing tags of the contact will be removed and replaced with the new tag.
Examples:
edit 3 n/Charlie Olive p/98989898edits the name and phone number of the 3rd contact to beCharlie Oliveand98989898respectively.edit 2 n/Betsy Crower t/edits the name of the 2nd contact to beBetsy Crowerand clears all existing tags.
Expected output:
- Expected message displayed in the output box:
Edited Person: CONTACT, whereCONTACTreflects the details of the contact edited. For example, running the command in the first example above results in the output messageEdited Person: Charlie Olive; Phone: 98989898; Email: charlotte@example.com; Address: Blk 11 Ang Mo Kio Street 74, #11-04; Role: Staff; Tags: [mentor]. - The edited details will also be reflected on ClassHive, as shown in the images below:
Before editing the 3rd contact:

After editing the 3rd contact:

Deleting a contact : delete
As you use ClassHive, there may be some contacts that will leave the school. Since you no longer need to contact them,
you can use the delete command to delete their information, ensuring ClassHive remains uncluttered with unnecessary information.
Format: delete n/NAME p/PHONE_NUMBER
Note:
- Deletes the contact with the specified
NAMEandPHONE_NUMBER. - The contact specified in the command must already be a contact in the app.
Examples:
delete n/John Doe p/98765432deletesJohn Doewith the phone number98765432from the app.
Expected output:
- Expected message displayed in the output box:
Deleted Person: CONTACT, whereCONTACTreflects the details of the contact deleted. For example, running the command in the example above will result in the output messageDeleted Person: John Doe; Phone: 98765432; Email: johnd@example.com; Address: John street, block 123, #01-01; Role: Student; Grade: SEC 1; Class: 1A; Parent's Name: Bob Doe; Parent's Phone: 92932011; Tags:.
Adding note to a contact : note
As you add more contacts into ClassHive, you might want to remember important details about them. The note command
allows you to add this information to specific contacts for easy reference later.
Format: note INDEX nt/NOTE
Note:
- The INDEX refers to the index number shown in the displayed contact list.
- The index must be a positive integer (1, 2, 3, ...).
- Any existing note for the contact will be replaced by the new note.
Examples:
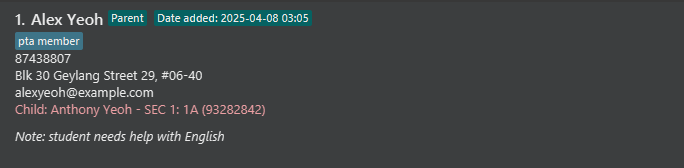
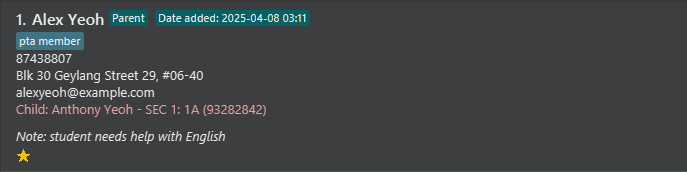
note 3 nt/prefers to be contacted after 5pmadds a note about contact preferences to the 3rd contact.note 1 nt/student needs help with Englishadds a note about academic needs to the 1st contact in the list.
Expected output:
- Expected message displayed in the output box:
Added note to Person: CONTACT, whereCONTACTreflects the details of the contact added. For example, upon running the command in the second example shown above, the expected output will beAdded note to Person: Alex Yeoh; Phone: 87438807; Email: alexyeoh@example.com; Address: Blk 30 Geylang Street 29, #06-40; Role: Parent; Child's Name: Anthony Yeoh; Child's Phone: 93282842; Child's Grade: SEC 1; Child's Class: 1A; Tags: [pta member] - The added note will also be reflected in ClassHive, as shown in the image below.
Finding contacts by name or phone number: find
There will be times when you need to quickly locate someone by name or phone number, the find command helps you do just that!
Format:
- For searching name:
find KEYWORD [MORE_KEYWORDS] - For searching phone number:
find NUMBER
Note:
- The search is case-insensitive. e.g
hanswill matchHans. - The order of the keywords does not matter. e.g.
Hans Bowill matchBo Hans. - Partial words/numbers will be matched e.g.
Hanwill match withHansor '9876' will match with '98765432'. - If you search with only numbers (e.g., 12345), it will be treated as a phone number search.
- Spaces between numbers (e.g., 123 456) will be treated as a name search containing those numbers.
Examples:
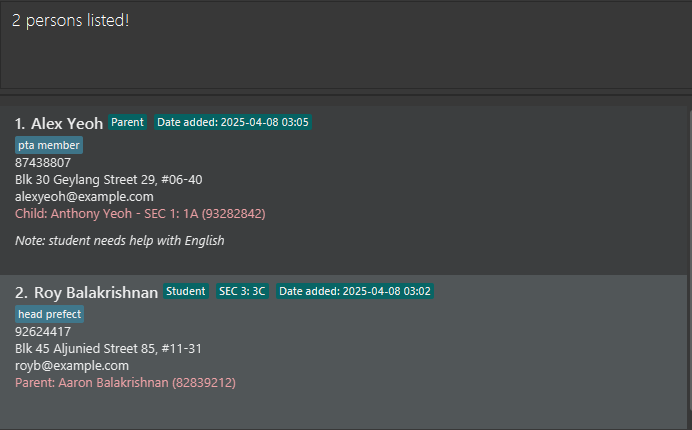
find 9876returns98766543,97659876and90987648find JohnreturnsJohnny LeeandJohn Doefind alreturnsRoy BalakrishnanandAlex Yeoh
Expected output:
- Expected message displayed in the output box:
[NUMBER] persons listed!, whereNUMBERreflects the number of contacts that match the keyword entered. For example, upon running the command in the third example shown above, the expected output will be2 persons listed! - The matching contacts will be displayed in ClassHive, as shown in the image below:
Listing all contacts : list
Shows a list of all contacts in ClassHive.
Format: list
Expected output:
- Expected message displayed in the output box:
Listed all persons - The full list of contacts will be displayed in the UI, regardless of the previous view or filters applied.
Sorting contacts : sort
As a teacher managing multiple classes, your contact list will eventually get larger over time. If you want to keep your
ClassHive contacts organized in a logical order, the sort command lets you arrange your contacts alphabetically by name
or chronologically by when they were added, making it easier to scan through your list.
Format: sort by [FIELD] [ORDER]
Note:
- Sorts the contacts based on the specified
FIELD(name or date) andORDER(asc or desc) FIELDcan be eithernameordate(referring to when the contact was added)ORDERcan be eitherasc(ascending) ordesc(descending)
Tip: Simply typing sort without any parameters will sort contacts alphabetically by name from A to Z.
Caution: sort command can only be used on the full contact list. If you've recently used find, group,
or any other filter-based command, run list first to reset the view.
Examples:
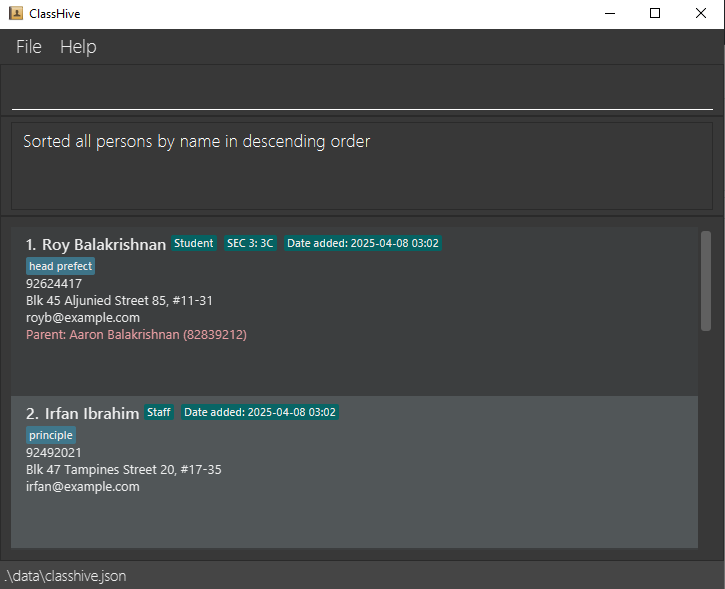
sort by name ascsorts all contacts alphabetically by name from A to Zsort by name descsorts all contacts alphabetically by name from Z to Asort by date ascsorts all contacts from oldest to newest addedsort by date descsorts all contacts from newest to oldest added
Expected output:
- Expected message displayed in the output box:
Sorted all persons by [FIELD] in [ORDER] order. For example, upon running the command in the second example shown above, the expected output will beSorted all persons by name in descending order - The sorted contacts will also be reflected on ClassHive, as shown in the images below:
Before any sorting is done:
After sorting by contacts' names in descending order:
Grouping contacts : group
With the group command, you can organize your contacts into specific categories, helping you quickly find the people you're looking for. Whether it’s by their role, class, grade, or favorite status, you can filter and group your contacts to keep your list well-organized.
Format:
group by CATEGORY [CRITERIA]
| Category | Criteria |
|---|---|
| Role | Parent, Student, Staff |
| Class | Any non-empty value |
| Grade | pri 1 to pri 6 or sec 1 to sec 5 |
| Favourite | No criteria needed |
Note:
- Group handles only one category at a time.
- Values are case-insensitive (e.g.,
Parent=parent). - Contacts that don't match will be hidden.
- Group by always operates on your full contact list, not just the currently displayed subset.
Tip: to clear any active group and show all contacts again, type ungroup.
Examples:
group by ROLE studentshows all students in your contact list.group by CLASS 2Ashows students and their parents from class 2A.group by GRADE pri 4shows all Primary 4 students and their parents.group by FAVOURITEshows all contacts marked as favourite.
Expected output:
- Expected message displayed in the output box:
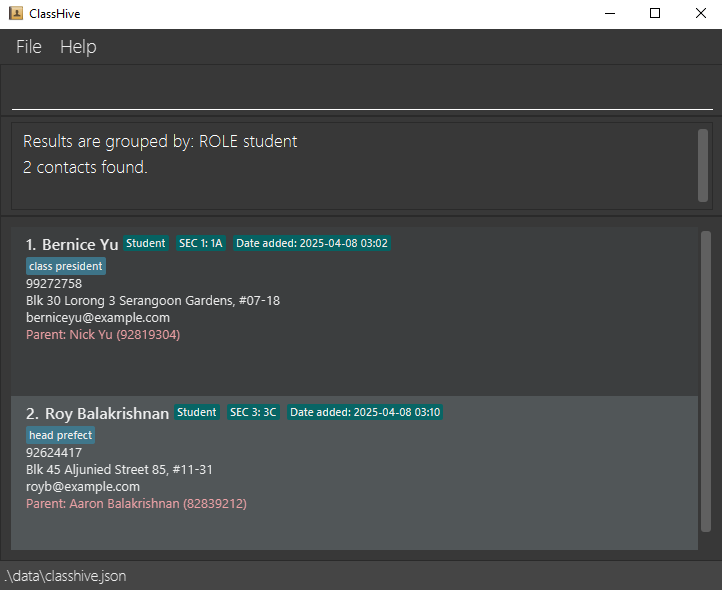
[NUMBER] persons listed!, whereNUMBERreflects the number of contacts that match the keyword entered. For example, upon running the command in the first example shown above, the expected output will be
Results are grouped by: ROLE student
2 contacts found. - You’ll see the grouped contacts reflected on ClassHive, as shown in the image below:
Favourite contacts: favourite
The favourite command lets you mark important contacts as favourites, making it easy to find and highlight them later. Whether it's a key student, parent, or colleague, you can quickly access your favourite contacts whenever needed.
Format: favourite INDEX
Note:
- The
INDEXrefers to the index number shown in the displayed contact list. - The index must be a positive integer 1, 2, 3, …
- To unmark a contact as favourite, simply mark them as favourite again. This toggles the favourite status.
Examples:
favourite 1marks the first contact on the list as favourite.favourite 1AGAIN, unfavourite the first contact on the list.
Expected output:
- Expected message displayed in the output box:
Toggled favourite status for: [CONTACT], whereCONTACTeflects the details of the contact whose favourite status was toggled. For example, upon running the command in the first example shown above, the expected output will beToggled favourite status for: Alex Yeoh; Phone: 87438807; Email: alexyeoh@example.com; Address: Blk 30 Geylang Street 29, #06-40; Role: Parent; Child's Name: Anthony Yeoh; Child's Phone: 93282842; Child's Grade: SEC 1; Child's Class: 1A; Tags: [pta member] - The star icon will appear or disappear next to the contact in the list, depending on their updated favourite status.
Exiting the program : exit
After you have finished updating your contacts, you will want to safely close ClassHive. The exit command allows you to
properly shut down the application, ensuring all changes are saved.
Format: exit
Saving the data
ClassHive data are saved in the hard disk automatically after any command that changes the data. There is no need to save manually.
Editing the data file
ClassHive data are saved automatically as a JSON file [JAR file location]/data/classhive.json. Advanced users are welcome to update data directly by editing that data file.
Caution:
If your changes to the data file makes its format invalid, ClassHive will discard all data and start with an empty data file at the next run. Hence, it is recommended to take a backup of the file before editing it.
Furthermore, certain edits can cause the ClassHive to behave in unexpected ways (e.g., if a value entered is outside the acceptable range). Therefore, edit the data file only if you are confident that you can update it correctly.
FAQ
Q: How do I transfer my data to another Computer?
A: Install the app in the other computer by following the instructions in the Quick Start section
and replace the empty data file it creates with the file that contains the data of your previous ClassHive home folder.
Known issues
- When using multiple screens, if you move the application to a secondary screen, and later switch to using only the primary screen, the GUI will open off-screen. To fix this issue, delete the
preferences.jsonfile created by the application before running the application again. - If you minimise the Help Window and then run the
helpcommand (or use theHelpmenu, or the keyboard shortcutF1) again, the original Help Window will remain minimised, and no new Help Window will appear. To fix this issue, manually restore the minimised Help Window.
💻 Command summary
| Action | Format, Examples |
|---|---|
| Help | help |
| Clear | clear |
| Add | add n/NAME p/PHONE_NUMBER e/EMAIL a/ADDRESS [t/TAG]… r/Student g/GRADE c/CLASS rn/KIN'S_NAME rp/KIN'S_PHONE Examples: Adding students: add n/John Doe p/98765432 e/johnd@example.com a/John street, block 123, #01-01 r/Student g/Sec 1 c/1A rn/Bob Doe rp/92932011 Adding parents: add n/Bob Doe p/92932011 e/bobd@example.com a/John street, block 123, #01-01 r/Parent rn/John Doe rp/98765432 g/Sec 1 c/1A Adding staff: add n/Betsy Crowe t/boss e/betsycrowe@example.com a/Serangoon Avenue 2 p/12345678 r/Staff |
| Delete | delete n/NAME p/PHONEe.g., delete n/Betsy Crowe p/12345678 |
| Edit | edit INDEX [n/NAME] [p/PHONE_NUMBER] [e/EMAIL] [a/ADDRESS] [t/TAG]…e.g., edit 2 n/James Lee e/jameslee@example.com |
| Note | note INDEX nt/NOTEe.g., note 1 nt/student needs extra help with Mathematics |
| Find | find KEYWORD [MORE_KEYWORDS]e.g., find James Tan find NUMBER e.g, find 98765432 |
| List | list |
| Sort | sort by [FIELD] [ORDER]e.g., sort by name asc, sort by date desc |
| Group | group by [category] [criteria]e.g., group by ROLE student, group by CLASS 1A, group by FAVOURITE, group by GRADE pri 1 |
| Ungroup | ungroup |
| Favourite | favourite [INDEX]e.g., favourite 1 |
| Exit | exit |
Tip:
All fields with square brackets around it, such as [t/TAG], denote an optional field.
🗝️ Prefix Summary
| Prefix | Used for specifying which field? | Used in which commands? |
|---|---|---|
| n/ | name | add, delete, edit for contacts of all roles |
| p/ | phone number | add, delete, edit for contacts of all roles |
| a/ | address | add, delete, edit for contacts of all roles |
| e/ | add, delete, edit for contacts of all roles | |
| t/ | tags | add, delete, edit for contacts of all roles |
| r/ | role | add, delete, edit for contacts of all roles |
| g/ | student's grade | add, delete, edit for Parent and Student contacts only |
| c/ | student's class | add, delete, edit for Parent and Student contacts only |
| rn/ | relative's name (child's name or parent's name) | add, delete, edit for Parent and Student contacts only |
| rp/ | relative's phone (child's phone or parent's phone) | add, delete, edit for Parent and Student contacts only |
| nt/ | note | note for contacts of all roles |